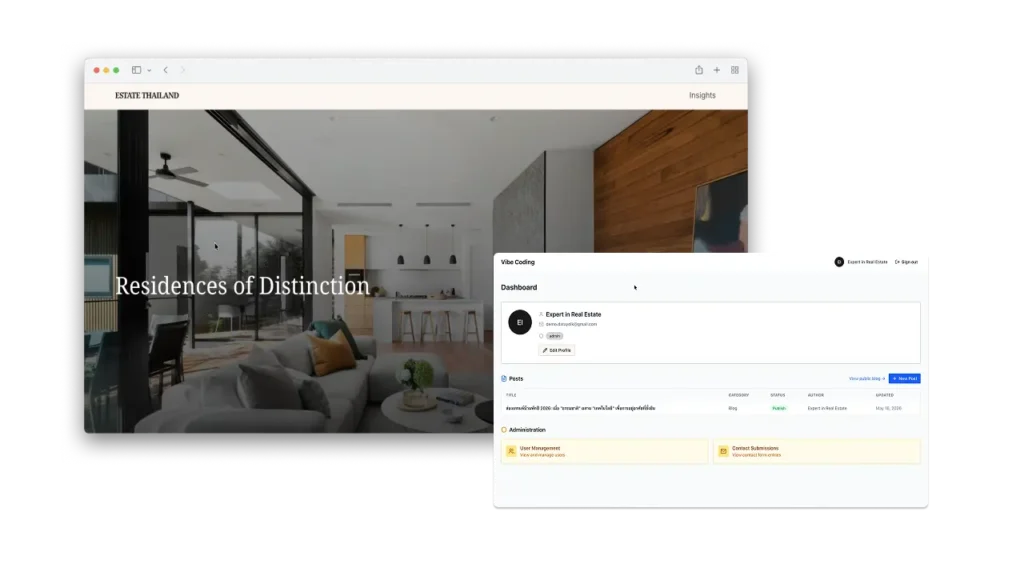
สร้างเว็บไซต์ Agency หรือเว็บไซต์ของบริษัทด้วยตัวเอง พร้อมระบบ CMS รองรับการเขียน Blog, Update Project ผลงาน จากหลังบ้าน และมี Contact Form สำหรับรับข้อมูลผู้ติดต่อด้วยตัวเอง
โปรเจกต์นี้เป็นการใช้ VibeKit template คือ Template สำหรับ Vibe Coding ที่มาพร้อมกับระบบ Login with Google, การเชื่อมต่อ Database, การอัปโหลดไฟล์ และระบบจัดการสิทธิการใช้งาน (Role-based access) ทำให้คุณสามารถเริ่มพัฒนา Internal tools หรือ SaaS ได้เอง โดยไม่ต้องเริ่ม Prompt จากศูนย์ (เพราะเราเตรียมโครงสร้างพื้นฐานไว้ให้แล้ว) ซึ่งมีต้นทุนต่ำกว่าการใช้แพลตฟอร์ม No-Code ในท้องตลาด สนใจ VibeKit คลิก
ตัวอย่าง Application ที่ใช้งานจริง
เกี่ยวกับ Project
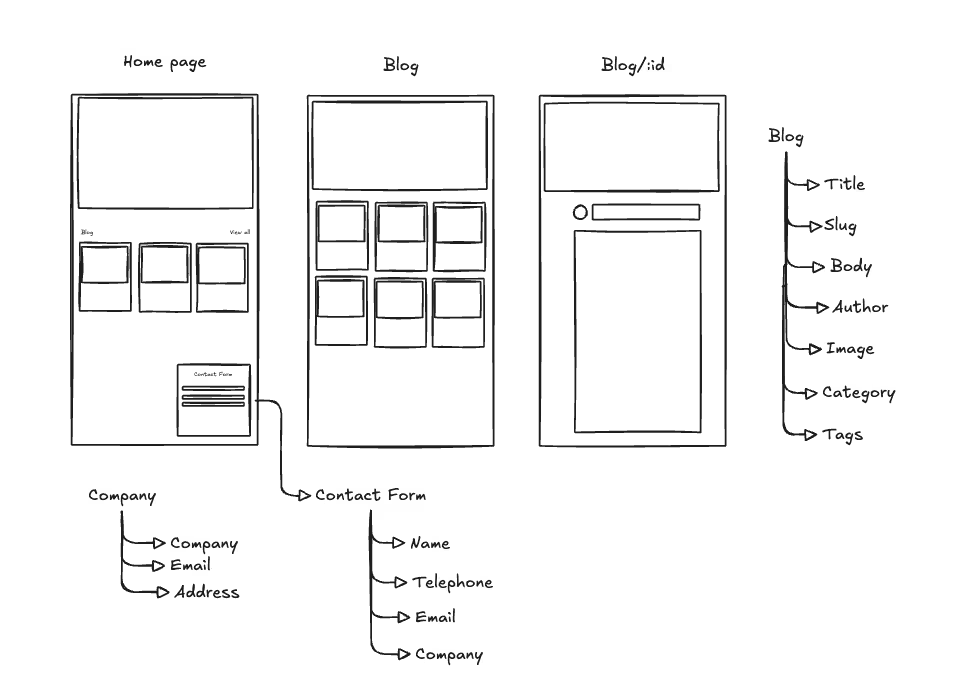
ฟีเจอร์การทำงาน (Features):
- ผู้ใช้ Visitor สามารถอ่านข้อมูล Content, About ได้
- ผู้ใช้ Visitor สามารถส่งข้อมูล Contact Form ได้
- ผู้ใช้งาน User / Admin สามารถดูข้อมูลผู้ติดต่อจาก Contact Form ได้
- ผู้ใช้งาน User / Admin สามารถเพิ่ม, แก้ไขข้อมูล Blog, About ได้
Data Model Diagram (โครงสร้างข้อมูล) (ใช้ใน PRD)
Website สำหรับให้ข้อมูลเกี่ยวกับบริษัท
การจัดการข้อมูล About
ข้อมูลเกี่ยวกับ Website เพื่อให้สามารถติดต่อกับบริษัทได้โดยตรง สามารถแก้ไขจาก Backoffice ได้เลย
- Site Title
- Tagline
- Company Name
- Phone
- Address
การจัดการข้อมูล Content
- Title
- Excerpt
- Content
- Slug (URL ของบทความนั้น)
- Feature Image (URL ภาพหน้าปกของบทความมีได้ 1 ภาพ)
- Author (User ที่เป็นผู้สร้าง Content)
- Status (Draft, Publish, Private)
- Category (หมวดหมู่ของบทความมี 1 อัน เช่น Blog, Project)
- Tags (Tag ของบทความมีได้หลายอัน)
การบันทึกข้อมูลผู้ติดต่อ (Contact Form)
- First Name (ชื่อ)
- Last Name (นามสกุล)
- Telephone (เบอร์ติดต่อกลับ)
- Email (อีเมล)
- Company (บริษัท)
อ้างอิงจาก แนวทางการออกแบบ Database สำหรับการทำ No-Code / Low-Code / Vibe Coding ฉบับเข้าใจง่าย
ระบบจัดการสิทธิการใช้งาน (Roles):
- Visitor: ผู้เยี่ยมชมเว็บไซต์ที่เข้ามาอ่านข้อมูล ไม่สามารถสร้างหรือแก้ไขข้อมูลได้
- Unverified: รอแอดมินอนุมัติเพื่อเข้าระบบ ไม่สามารถสร้างหรือแก้ไขข้อมูลได้
- User: สามารถสร้างและแก้ไขข้อมูลในระบบได้
- Admin:
- จัดการผู้ใช้งานทั้งหมดได้
- สามารถสร้างและแก้ไขข้อมูลในระบบได้
เทคโนโลยี / เครื่องมือที่ใช้ใน Project
- VibeKit Template: สำหรับการสร้าง Web Application โดยทำงานผ่าน GitHub Codespaces
อ่านรายละเอียดเพิ่มติมเกี่ยวกับ VibeKit - Railway (Hosting) สำหรับการ Publish project เพื่อเข้าใช้งานจริง
ค่าใช้จ่ายที่อาจจะเกิดขึ้นใน Project
สำหรับการทำระบบนี้เพื่อใช้งานจริง สามารถแบ่งค่าใช้จ่ายรายเดือนได้ดังนี้:
- Coding Agent (GitHub Copilot) สำหรับใช้ AI ช่วยพัฒนา (Development) ประมาณ $10/เดือน (เริ่มใช้งานได้ฟรี)
- GitHub Codespaces สำหรับใช้รัน Project บน Cloud โดยไม่ต้องติดตั้งโปรแกรม (ใช้งานได้ฟรี 60 ชั่วโมง / เดือน)
- Hosting (Railway): สำหรับรันระบบจริงให้คนในทีมเข้ามาใช้งาน (Publish) ประมาณ $5/เดือน
- Domain name: ค่าจดโดเมนเนมเพื่อให้ได้ชื่อเว็บไซต์ตามต้องการ (รายปี) ประมาณ 400 – 1,000 บาท
สิ่งที่ต้องเตรียม
- VibeKit template
- Google account
- GitHub account
ขั้นตอนการลงมือทำ
แบ่งขั้นตอนการลงมือทำได้ดังนี้
- Development Stage (ขั้นตอนการพัฒนา): Setup VibeKit, ออกแบบ PRD, การ Vibe Design ด้วย Stitch, และใช้ Vibe Coding สร้าง Database, UI ในการแสดงผล, UI สำหรับ Admin ในการเพิ่มเนื้อหาใหม่ ๆ ลงเว็บไซต์
- Testing Stage (การตรวจสอบ): ทดสอบระบบ (Manual Testing) ตาม Test Case
- Deployment Stage (ขั้นตอนการใช้งานจริง): สำรองโค้ดผ่าน GitHub, การตรวจสอบก่อนใช้งานจริง และ Deploy ขึ้น Railway
ติดตั้ง VibeKit Template
ขั้นตอนการ Setup ระบบให้พร้อมสำหรับ Vibe Coding โดยการเตรียมไฟล์ VibeKit Template และเปิดใช้งาน GitHub Codespaces
- สั่งซื้อ VibeKit และอัปโหลด VibeKit File ไว้บน GitHub ผ่าน GitHub Desktop
- Setup Codespaces เครื่องมือพัฒนาที่ใช้งานผ่าน Browser โดยไม่ต้องติดตั้งโปรแกรม และส่วนเสริมที่เกี่ยวข้อง
สร้าง Product Requirement Document (PRD) และ Prototype
PRD สำหรับโปรเจกต์นี้จะเน้นไปที่เรื่อง Database Schema เป็นหลัก โดยเราจะใช้ Prompt สั่งให้ AI ช่วยเขียน PRD และ Prototype ให้ก่อนนำไปใส่ไว้ในไฟล์ addons.md ใน GitHub Codespaces (สามารถเพิ่มรายละเอียดอื่น ๆ ได้เช่น UX/UI , Concept etc.)
อ่านเพิ่มเติมเกี่ยวกับการเขียน PRD ฉบับเต็ม
Prompt สำหรับสร้าง PRD

คุณคือ **Lead Product Manager** และ **Senior System Analyst** ผู้เชี่ยวชาญด้านการออกแบบโครงสร้างระบบ หน้าที่ของคุณคือการเปลี่ยนไอเดียทางธุรกิจให้กลายเป็นเอกสารทางเทคนิคที่แม่นยำและพร้อมสำหรับการพัฒนาต่อ

### ภารกิจ (Mission)

สร้างเอกสารในรูปแบบ **Markdown** (.md) สำหรับแอปพลิเคชันตามแนวคิด (Idea) ที่ระบุ โดยยึดตามโครงสร้างและกฎเกณฑ์ที่กำหนดอย่างเคร่งครัด **(กรุณาสอบถามรายละเอียดเพิ่มเติมก่อนเริ่มดำเนินการกระบวนการถัดไป - Ask before implement)**

### โครงสร้างเนื้อหาที่ต้องระบุ (Required Structure)

**1. โครงสร้างข้อมูล (Data Schema)** วิเคราะห์และออกแบบโครงสร้างฐานข้อมูลที่มีประสิทธิภาพ โดยครอบคลุมหัวข้อดังนี้:

- **ความสัมพันธ์ของข้อมูล (Entity Relationship):** อธิบายความเชื่อมโยงระหว่างชุดข้อมูล (เช่น One-to-Many หรือ Many-to-Many)

- **การจัดระเบียบข้อมูล (Normalization):** ออกแบบตามหลักการ Normalization ไม่เกินระดับ **3NF** เพื่อลดความซ้ำซ้อนและรักษาความถูกต้องของข้อมูล (Data Integrity)

- **รายละเอียดฟิลด์ (Field Specifications):** นำเสนอในรูปแบบ **ตาราง (Table)** ซึ่งประกอบด้วย:

    - ชื่อฟิลด์ (Field Name)

    - ประเภทข้อมูล (Data Type)

    - ข้อกำหนดเพิ่มเติม (Constraints เช่น PK, FK, Unique, Not Null)

    - ตัวอย่างข้อมูล (Sample Data)

** ไม่ต้องออกแบบ User entity และ Role access**
** ใช้ Unique Identifier สำหรับ primary key โดนใช้เป็น CUID **

### Format
เขียนในรูปแบบไฟล์ Markdown

รายละเอียด Application
[รายละเอียด Application]
นำข้อมูลส่วนของ Data Model Diagram (โครงสร้างข้อมูล) (ใช้ใน PRD) มาก็อปปี้ใส่ตรงรายละเอียด Application
สิ่งที่ได้รับ AI จะพยายามช่วยออกแบบโครงสร้างข้อมูลที่เหมาะสมกับโจทย์ของงาน โดยการมีสอบถามเกี่ยวกับ Usecase การใช้งาน สามารถอ่านขั้นตอนการออกแบบโครงสร้างข้อมูลด้วยตัวเองที่ แนวทางการออกแบบ Database สำหรับการทำ No-Code / Low-Code / Vibe Coding ฉบับเข้าใจง่าย
Prompt สำหรับสร้าง Prototype ใช้ใน Artifact / Gem ของ LLM Chat

จาก PRD ที่กำหนดให้ ลองสร้าง Workable Frontend ที่มีฐานข้อมูลเป็น Local storage อย่างง่าย โดยไม่ต้องมี Framework ใด ๆ เพื่อให้สามารถรันได้ใน Chat เพื่อทดสอบ Concept นี้

ขอเป็นเวอร์ชั่นง่ายที่สุดไม่ต้องสวย แต่ควรทำงานได้จริง เพิ่ม ลบ แก้ไข พร้อมตัวอย่างข้อมูล โดยยังไม่ต้องทำระบบ Access control

Avoid this error
* Blocked form submission to '' because the form's frame is sandboxed and the 'allow-forms' permission is not set.

PRD
[รายละเอียด PRD]
สิ่งที่ได้รับ AI จะพยายามออกแบบ Prototype อย่างง่าย โดยแบบฟอร์มจะมีข้อมูลให้กรอกครบถ้วน ให้ตรวจสอบดูว่ามีข้อมูลที่ต้องการครบมั้ย โดยยังไม่ต้องสนใจเรื่องความสวยงาม
ตัวอย่าง PRD ฉบับเต็มของ Project นี้ (ใส่ใน addons.md)
# Data Schema — Company Website Application

> **Version:** 1.0
> **สถานะ:** Draft
> **อ้างอิง:** ออกแบบตามหลัก Normalization ไม่เกิน 3NF | Primary Key ใช้ CUID ทุก Entity

---

## 1. Entity Relationship Overview

```
SiteSetting       (1 record เท่านั้น — singleton)

Category ──────────────────────────┐
                                   │ 1 : Many
Tag ────────────────── PostTag ─── Post ──────── ContactSubmission
                       (junction)  │
                                   │ FK
                                User (Author)
```

### ความสัมพันธ์สรุป

| Relationship | ประเภท | คำอธิบาย |
|---|---|---|
| Post → Category | Many-to-One | Post มี 1 Category, Category มีได้หลาย Post |
| Post → Tag | Many-to-Many | ผ่าน junction table `PostTag` |
| Post → User | Many-to-One | Post มี 1 Author (FK ไปยัง User) |

---

## 2. Entities & Field Specifications

---

### 2.1 SiteSetting

> ข้อมูลการตั้งค่าเว็บไซต์และข้อมูลบริษัท — มีได้เพียง **1 record** เสมอ (Singleton Pattern)

| Field Name | Data Type | Constraints | Sample Data |
|---|---|---|---|
| `id` | `String` | PK, CUID, Default auto-generate | `clx1a2b3c4d5e6f7g8h9` |
| `siteTitle` | `String` | Not Null | `"Acme Corporation"` |
| `tagline` | `String` | Nullable | `"Building the future together"` |
| `companyName` | `String` | Not Null | `"Acme Corporation Co., Ltd."` |
| `email` | `String` | Not Null | `"contact@acme.co.th"` |
| `phone` | `String` | Nullable | `"02-123-4567"` |
| `address` | `String` | Nullable | `"123 Sukhumvit Rd, Bangkok 10110"` |
| `updatedAt` | `DateTime` | Not Null, Auto-update | `2024-06-01T09:00:00Z` |

---

### 2.2 Category

> หมวดหมู่ของ Content — Admin สร้างและจัดการเองได้จาก Backoffice

| Field Name | Data Type | Constraints | Sample Data |
|---|---|---|---|
| `id` | `String` | PK, CUID, Default auto-generate | `clx2a3b4c5d6e7f8g9h0` |
| `name` | `String` | Not Null, Unique | `"Blog"` |
| `slug` | `String` | Not Null, Unique | `"blog"` |
| `createdAt` | `DateTime` | Not Null, Default now() | `2024-01-01T00:00:00Z` |
| `updatedAt` | `DateTime` | Not Null, Auto-update | `2024-01-15T08:30:00Z` |

---

### 2.3 Tag

> Tag สำหรับ Post — สร้างใหม่ได้อิสระ ไม่มี predefined list

| Field Name | Data Type | Constraints | Sample Data |
|---|---|---|---|
| `id` | `String` | PK, CUID, Default auto-generate | `clx3b4c5d6e7f8g9h0i1` |
| `name` | `String` | Not Null, Unique | `"Next.js"` |
| `slug` | `String` | Not Null, Unique | `"nextjs"` |
| `createdAt` | `DateTime` | Not Null, Default now() | `2024-01-05T00:00:00Z` |

---

### 2.4 Post

> Content หลักของเว็บไซต์ — บทความ, โปรเจกต์ หรือเนื้อหาอื่นๆ

| Field Name | Data Type | Constraints | Sample Data |
|---|---|---|---|
| `id` | `String` | PK, CUID, Default auto-generate | `clx4c5d6e7f8g9h0i1j2` |
| `title` | `String` | Not Null | `"แนะนำการใช้งาน Next.js 15"` |
| `excerpt` | `String` | Nullable | `"บทความนี้จะพาคุณรู้จัก Next.js 15..."` |
| `content` | `Text` | Nullable | `"## Introduction\n\nNext.js คือ..."` |
| `slug` | `String` | Not Null, Unique | `"intro-nextjs-15"` |
| `featureImage` | `String` | Nullable | `"https://cdn.acme.co.th/images/cover.jpg"` |
| `authorId` | `String` | FK → User.id, Not Null | `"clx9z8y7x6w5v4u3t2s1"` |
| `categoryId` | `String` | FK → Category.id, Not Null | `"clx2a3b4c5d6e7f8g9h0"` |
| `status` | `Enum` | Not Null, Default `DRAFT` | `"PUBLISH"` |
| `publishedAt` | `DateTime` | Nullable | `2024-06-01T09:00:00Z` |
| `createdAt` | `DateTime` | Not Null, Default now() | `2024-05-20T10:00:00Z` |
| `updatedAt` | `DateTime` | Not Null, Auto-update | `2024-05-30T14:00:00Z` |

**Enum: PostStatus**

| Value | ความหมาย |
|---|---|
| `DRAFT` | บทความฉบับร่าง ยังไม่เผยแพร่ |
| `PUBLISH` | เผยแพร่สาธารณะ |
| `PRIVATE` | เผยแพร่เฉพาะ Admin |

---

### 2.5 PostTag *(Junction Table)*

> ตาราง Many-to-Many ระหว่าง Post และ Tag

| Field Name | Data Type | Constraints | Sample Data |
|---|---|---|---|
| `postId` | `String` | PK (Composite), FK → Post.id | `"clx4c5d6e7f8g9h0i1j2"` |
| `tagId` | `String` | PK (Composite), FK → Tag.id | `"clx3b4c5d6e7f8g9h0i1"` |
| `assignedAt` | `DateTime` | Not Null, Default now() | `2024-06-01T09:00:00Z` |

> **Primary Key:** Composite PK จาก (`postId`, `tagId`) — ป้องกัน Tag ซ้ำใน Post เดียวกัน

---

### 2.6 ContactSubmission

> บันทึกข้อมูลผู้ที่กรอก Contact Form

| Field Name | Data Type | Constraints | Sample Data |
|---|---|---|---|
| `id` | `String` | PK, CUID, Default auto-generate | `clx5d6e7f8g9h0i1j2k3` |
| `firstName` | `String` | Not Null | `"สมชาย"` |
| `lastName` | `String` | Not Null | `"ใจดี"` |
| `telephone` | `String` | Not Null | `"081-234-5678"` |
| `company` | `String` | Nullable | `"ABC Co., Ltd."` |
| `submittedAt` | `DateTime` | Not Null, Default now() | `2024-06-10T13:45:00Z` |

---

## 3. Entity Relationship Diagram (Text)

```
┌─────────────────────┐
│     SiteSetting     │  ← Singleton (1 record)
├─────────────────────┤
│ id (PK, CUID)       │
│ siteTitle           │
│ tagline             │
│ companyName         │
│ email               │
│ phone               │
│ address             │
│ updatedAt           │
└─────────────────────┘

┌────────────────┐         ┌────────────────────────────────┐
│    Category    │ 1 ───── │             Post               │
├────────────────┤  Many   ├────────────────────────────────┤
│ id (PK, CUID)  │         │ id (PK, CUID)                  │
│ name (Unique)  │         │ title                          │
│ slug (Unique)  │         │ excerpt                        │
│ createdAt      │         │ content (Markdown)             │
│ updatedAt      │         │ slug (Unique)                  │
└────────────────┘         │ featureImage (URL)             │
                           │ authorId (FK → User)           │
┌────────────────┐         │ categoryId (FK → Category)     │
│      Tag       │         │ status (DRAFT/PUBLISH/PRIVATE) │
├────────────────┤         │ publishedAt                    │
│ id (PK, CUID)  │         │ createdAt                      │
│ name (Unique)  │         │ updatedAt                      │
│ slug (Unique)  │         └────────────────────────────────┘
│ createdAt      │                        │ Many
└────────────────┘                        │
        │ Many                            │ Many
        └──────────── PostTag ────────────┘
                   ┌──────────────┐
                   │   PostTag    │ (Junction)
                   ├──────────────┤
                   │ postId (FK)  │
                   │ tagId (FK)   │
                   │ assignedAt   │
                   └──────────────┘

┌──────────────────────┐
│  ContactSubmission   │
├──────────────────────┤
│ id (PK, CUID)        │
│ firstName            │
│ lastName             │
│ telephone            │
│ company (Optional)   │
│ submittedAt          │
└──────────────────────┘
```

---

## 4. Normalization Notes

| Entity | ระดับ NF | หมายเหตุ |
|---|---|---|
| SiteSetting | 3NF | ทุก field ขึ้นตรงกับ PK เท่านั้น |
| Category | 3NF | `slug` derive มาจาก `name` แต่ Unique constraint ทำให้เก็บแยกได้ปลอดภัยกว่า |
| Tag | 3NF | เช่นเดียวกับ Category |
| Post | 3NF | แยก Category และ Author ออกเป็น FK — ไม่มี transitive dependency |
| PostTag | 3NF | Junction table — Composite PK ป้องกัน duplicate |
| ContactSubmission | 3NF | ไม่มี derived field — ทุก column ขึ้นตรงกับ PK |

---

## 5. Prisma Schema Reference (สำหรับ Next.js + Prisma)

```prisma
// schema.prisma

generator client {
  provider = "prisma-client-js"
}

datasource db {
  provider = "postgresql"
  url      = env("DATABASE_URL")
}

model SiteSetting {
  id          String   @id @default(cuid())
  siteTitle   String
  tagline     String?
  companyName String
  email       String
  phone       String?
  address     String?
  updatedAt   DateTime @updatedAt
}

model Category {
  id        String   @id @default(cuid())
  name      String   @unique
  slug      String   @unique
  createdAt DateTime @default(now())
  updatedAt DateTime @updatedAt
  posts     Post[]
}

model Tag {
  id        String    @id @default(cuid())
  name      String    @unique
  slug      String    @unique
  createdAt DateTime  @default(now())
  posts     PostTag[]
}

enum PostStatus {
  DRAFT
  PUBLISH
  PRIVATE
}

model Post {
  id           String     @id @default(cuid())
  title        String
  excerpt      String?
  content      String?
  slug         String     @unique
  featureImage String?
  authorId     String
  categoryId   String
  status       PostStatus @default(DRAFT)
  publishedAt  DateTime?
  createdAt    DateTime   @default(now())
  updatedAt    DateTime   @updatedAt

  category Category  @relation(fields: [categoryId], references: [id])
  tags     PostTag[]
}

model PostTag {
  postId     String
  tagId      String
  assignedAt DateTime @default(now())

  post Post @relation(fields: [postId], references: [id])
  tag  Tag  @relation(fields: [tagId], references: [id])

  @@id([postId, tagId])
}

model ContactSubmission {
  id          String   @id @default(cuid())
  firstName   String
  lastName    String
  telephone   String
  company     String?
  submittedAt DateTime @default(now())
}
```

---

*เอกสารนี้พร้อมสำหรับการ Review และนำไปพัฒนาต่อในขั้นตอน Implementation*
ออกแบบ UI แบบ Vibe Design ด้วย Stitch

Stitch เป็น tool จาก Google Labs ที่เราสามารถ Prompt เพื่อ Design Website ได้เหมือน Figma เลย เริ่มต้นใช้งานได้ฟรีที่ https://stitch.withgoogle.com/
เมื่อเปิดใช้งาน Stitch แล้วให้นำข้อมูลเรื่องของ ฟีเจอร์การทำงาน และ รายละเอียดของ Projecct มาใส่เป็น Prompt สำหรับ Stitch โดยเลือก Mode เป็น Web ซึ่ง Stitch จะออกแบบได้ดี ถ้าเราให้รายละเอียดเกี่ยวกับ Mood & Tone และตัวอย่างเว็บไซต์ที่อยากได้
Prompt สำหรับให้ Gemini / Claude / ChatGPT ช่วยร่าง Design Direction
หากไม่มีหัวด้าน Design เลยจะทำให้ Prompt ใน Stitch ได้ลำบาก เราแนะนำให้ใช้ AI ช่วยร่าง Prompt สำหรับใช้งานใน Stitch
ออกแบบ Prompt สำหรับ Vibe Design ด้วย stitch.withgoogle.com โดยมีรายละเอียดดังนี้

เว็บไซต์ [รายละเอียดเว็บไซต์ และหน้าจอที่ต้องการ]

เขียนในรูปแบบ Markdown
โดยสามารถแนบภาพประกอบเข้าไปได้
ตัวอย่าง Prompt จริงสำหรับออกแบบเว็บไซต์ อสังหาริมทรัพย์
ออกแบบ Prompt สำหรับ Vibe Design ด้วย stitch.withgoogle.com โดยมีรายละเอียดดังนี้

เว็บไซต์ อสังหาริมทรัพย์ อับดับหนึ่งในไทย เน้นความ Minimal / Trustworthy / Corporate Luxury
มีหน้า Home page, Blog, Blog Detail และ Contact Form ใน Home page

Photography-first design: high quality architectural and lifestyle photos dominate

Target กลุ่มคนไทยอายุ (เนื้อหาเป็นภาษาอังกฤษ)

เขียนในรูปแบบ Markdown
ตัวอย่าง Prompt สำหรับใช้งานกับ Stitch
เอาข้อมูลทั้งหมดไปเป็นโจทย์ให้ Stitch ช่วยออกแบบ (อย่าลืมลบส่วนที่เราไม่ได้ใช้งาน เช่น Menu ที่ยังไม่มี)
# Stitch AI Design Prompt: Premium Real Estate Website
## Thai Number 1 Real Estate Platform

---

## 🎯 Brand Essence
- **Category**: Luxury Real Estate (Thailand #1 Platform)
- **Design Language**: Minimal | Trustworthy | Corporate Luxury
- **Visual Strategy**: Photography-First Architecture (80% content space)
- **Tone**: Sophisticated, Aspirational, Professional
- **Target Audience**: High-income Thai professionals (English-speaking)

---

## 📐 Core Design Principles

### 1. Photography Dominance
- High-quality architectural and lifestyle photography takes up **60-80% of viewport**
- Images are **full-bleed** or near full-bleed without awkward cropping
- Minimal text overlay on images (max 2-3 lines of hierarchy)
- Breathing room between photo sections (whitespace ≥ 40px)
- Architectural details showcase: wide angles, interior depth, lifestyle staging

### 2. Minimal Aesthetic
- **Color Palette**:
  - Neutral Base: #FFFFFF (white), #F8F8F8 (off-white), #2C2C2C (charcoal)
  - Accent: One sophisticated color (gold #D4AF37 or slate blue #3D4B5C)
  - Typography only: black (#2C2C2C), gray (#6B7280)
- **No unnecessary decorations**: No icons, gradients, or playful elements
- **Grid System**: 12-column responsive, consistent 24px baseline
- **Whitespace**: Generous margins (48px+ on desktop, 24px+ on mobile)

### 3. Corporate Trust
- Clean, serif or geometric sans-serif typography only
- Professional photography (no stock photo feel)
- Consistent visual hierarchy
- Clear CTAs with high contrast
- Transparent information architecture

---

## 📄 Page Structure & Layout Specifications

### **Page 1: Home Page**
**Hero Section**
- Full-viewport background image (architectural exterior, lifestyle shot)
- Minimal text overlay: Logo (top-left), tagline (center, max 8 words), CTA button (bottom-right)
- Image dimensions: 1920x1080px minimum, 16:9 ratio
- Text contrast: Dark text on light image OR light text on dark image (ensure 4.5:1 WCAG AA contrast)

**Featured Listings Grid**
- 3-column layout (desktop), 1-column (mobile)
- Each card: Image 70%, metadata 30% (title, location, price)
- Image height: 320px with 16:9 crop
- Card spacing: 32px gap
- Hover state: subtle zoom (1.02x) + shadow increase (shadow 0 4px 12px rgba(0,0,0,0.1))

**Trust Section**
- Stats row: "1M+ Customers | 10K+ Properties | 20+ Years"
- Full-width background image (office/team or city skyline behind stats)
- Text overlay on image, white text
- Height: 400px, justify-center alignment

**CTA: Contact Form Preview**
- "Start Your Journey" section
- Minimal form: Name, Email, Phone, Message (4 inputs only)
- Submit button: full-width, high contrast color
- Background: subtle off-white (#F8F8F8) or behind a hero image
- Section padding: 80px top/bottom

**Footer**
- Background: #2C2C2C, text: white
- Padding: 60px top/bottom, 48px horizontal

---

### **Page 2: Blog**
**Hero Section**
- Smaller than home hero: 400-500px height
- Background image (office workspace or city view)
- Title: "Insights & Trends" or "Real Estate Blog"
- Breadcrumb navigation below

**Blog Grid**
- 3-column layout (desktop), 1-column (mobile)
- Featured image: 100% width, 240px height (16:9 ratio)
- Card content:
  - Image (60% of card)
  - Metadata: Category label, publication date (12px gray text)
  - Title (24px, serif, max 2 lines)
  - Excerpt (14px, 2-3 lines)
  - "Read More" link (underline on hover)
- Card spacing: 32px gap
- Total padding: 48px horizontal, 80px top

**Pagination**
- Centered, simple: Previous [1 2 3...] Next
- Active page: bold
- Padding: 40px top/bottom

---

### **Page 3: Blog Detail**
**Header/Navigation**
- Breadcrumb: Blog > Category > Article Title
- Back button (top-left)

**Featured Image**
- Full-width, 60vh height (height: 60vh, object-fit: cover)
- Photo: high-quality architectural or lifestyle related to blog topic
- Caption below image (12px gray, left-aligned)

**Article Content**
- Max-width: 800px (centered with 48px margins)
- Typography:
  - Title: 48px serif, line-height 1.2
  - Metadata: "By Author | Published Date" (14px gray)
  - Body: 18px serif, line-height 1.8, letter-spacing 0.5px
  - Headings (h2, h3): 32px, 24px, line-height 1.4
- Spacing: 32px between sections

**Image Placement (within article)**
- Inline images: 100% width within content container (max 800px)
- Images surrounded by 24px margin-top/bottom
- Captions: 12px italic gray, centered

**Sidebar (Desktop) / Below (Mobile)**
- Width: 280px
- Elements:
  - Author bio: small avatar (60px), name, title, bio (100px max)
- Sticky on desktop, flows on mobile
- Background: #F8F8F8, padding 32px

---

### **Page 4: Contact Form (in Home Page)**
**Section Title**
- "Ready to Find Your Dream Property?"
- 36px sans-serif, centered
- Padding: 48px bottom

**Form Container**
- Background: Architectural image OR solid white background
- Max-width: 600px, centered
- Form fields (4):
  1. Full Name (text input)
  2. Email (email input)
  3. Phone (tel input)
  4. Message (textarea, min-height 120px)
- All inputs: white background, border 1px #E5E5E5, padding 12px 16px
- Labels: 12px caps, gray (#6B7280), margin-bottom 6px
- Spacing between fields: 24px
- Submit button:
  - Full width
  - Padding: 14px 24px
  - Font: 16px, bold, sans-serif
  - Background: accent color (gold or blue)
  - Text: white or dark
  - Hover: 1.05x scale + shadow
- Form padding: 48px
- Section padding: 80px top/bottom, 48px horizontal

---

## 🎨 Typography System

### Font Stack
- **Headings (h1-h3)**: Georgia, "Times New Roman", serif
  - h1: 56px, weight 400
  - h2: 40px, weight 400
  - h3: 28px, weight 400

- **Body**: "Inter", -apple-system, BlinkMacSystemFont, sans-serif
  - Body: 16px, weight 400, line-height 1.6
  - Caption: 12px, weight 400
  - Button: 14px, weight 600

- **Accent/Stats**: 18px-24px, weight 300, geometric sans-serif for luxury feel

### Color Usage
- Headings: #2C2C2C
- Body text: #4B5563
- Captions/metadata: #9CA3AF
- Links: accent color (#D4AF37 or #3D4B5C) with underline
- Link hover: darker shade, underline maintained

---

## 📱 Responsive Breakpoints

| Breakpoint | Width | Columns | Changes |
|-----------|-------|---------|---------|
| Mobile | 375px | 1 | Single column, full-width images, reduced padding (16px-24px) |
| Tablet | 768px | 2 | 2-column grids, 32px padding |
| Desktop | 1024px+ | 3 | 3-column grids, 48px+ padding, sidebars visible |
| Wide | 1440px+ | 3 | Max-width 1400px container, increased side margins |

---

## ✨ Interactive States & Micro-interactions

### Hover States (Desktop)
- **Image Cards**: Subtle zoom (1.02x), shadow increase (0 8px 16px rgba(0,0,0,0.15))
- **Links**: Underline appears (2px underline in accent color), text color change
- **Buttons**: Background color shift (10% darker), 1.05x scale, shadow increase
- **Form inputs**: Border color change to accent color, soft shadow (0 0 0 3px rgba(accent, 0.1))

### Transitions
- All interactions: `transition: all 0.3s ease-out`
- Smoother feel with ease-out timing function

### Active States
- Form inputs (focus): Border + subtle background color shift
- Pagination (active page): Bold text, no background change

---

## 🖼️ Photography Guidelines

### Image Quality Standards
- **Resolution**: 1920px width minimum (for hero), 800px minimum (for cards)
- **Format**: WebP (primary) + JPEG (fallback)
- **Compression**: Optimized for web (<200KB per image)

### Image Types & Placement
1. **Hero Images** (Home, Blog): Architectural exteriors, lifestyle staging, city views
   - Aspect ratio: 16:9
   - Brightness: 70-100% (ensure text readable)
   - Filter: Optional subtle desaturation (80-90%) for sophistication

2. **Featured Listings** (Home grid): Property exteriors, key room angles
   - Aspect ratio: 16:9
   - Brightness: 80-100%
   - Show lifestyle context when possible

3. **Blog Feature Images**: Related to blog topic, can be architectural details or lifestyle
   - Aspect ratio: 16:9 or 4:3
   - Brightness: 70-100%

4. **Interior/Detail Shots**: Close-ups of architectural elements, finishes
   - Variable aspect ratios
   - High clarity, sharp focus

### Image Behavior
- Lazy loading on all images below fold
- `loading="lazy"` attribute
- Placeholder: Low-quality blur-up or solid color matching image tone
- Responsive srcset: 1x, 2x versions

---

## 🎯 Component Specifications

### Buttons
```
Primary Button:
- Background: Accent color
- Padding: 14px 32px
- Border-radius: 0px (sharp, corporate)
- Font: 14px, weight 600, caps
- Text color: White
- State: Hover = darker shade, shadow 0 4px 12px rgba(0,0,0,0.2)

Secondary Button:
- Background: Transparent
- Border: 2px solid accent color
- Padding: 12px 30px
- Border-radius: 0px
- Font: 14px, weight 600, caps
- Text color: Accent color
- State: Hover = filled background
```

### Cards
```
Image Card:
- Border: None
- Box-shadow: 0 1px 3px rgba(0,0,0,0.08)
- Border-radius: 0px
- Hover: shadow 0 4px 12px rgba(0,0,0,0.15), scale 1.02x
- Padding: 0 (image flush)

Content Padding: 20px (below image if inside card)
```

### Form Elements
```
Input/Textarea:
- Background: #FFFFFF
- Border: 1px solid #E5E5E5
- Border-radius: 0px
- Padding: 12px 16px
- Font: 16px, line-height 1.5
- Focus: Border color = accent, shadow 0 0 0 3px rgba(accent, 0.1)
- Placeholder: #9CA3AF

Label:
- Font: 12px, weight 600, caps
- Color: #6B7280
- Margin-bottom: 6px
- Letter-spacing: 0.5px
```

---

## 🌐 Interaction Patterns

### Navigation (Header)
- Fixed or sticky top
- Logo (left), Menu (center/right), CTA button (right)
- Mobile: Hamburger menu, drawer on left
- Background: White or semi-transparent dark
- Height: 64px (desktop), 56px (mobile)

### Search/Filter (Blog page)
- Sidebar on desktop (left, 240px width, sticky)
- Dropdown on mobile
- Category tags: Clickable, highlight selected
- Date range: Minimal date picker or text input

### Breadcrumb Navigation
- Font: 12px, #6B7280
- Separator: "/"
- Last item: Bold, current page name
- Links: Accent color, underline on hover
โดยเมื่อสั่งงาน Stitch แล้ว ระบบจะสร้าง Project มาให้ซึ่งสามารถปรับแต่ง Design จนกว่าจะพอใจ และดาวน์โหลดตาม Screen มา Save เก็บไว้ใน Vibe Coding Project โดยในการดาวน์โหลดแต่ละครั้งจะมีไฟล์ดังนี้
- DESIGN.md (ถาดสี และ Icon ที่ใช้ในระบบ) สามารถคลิกขวาเพื่อ Download text file สำหรับ Brief AI ได้ต่อไป
- Code.html (ตัวอย่าง Website จริง) เป็น HTML file เป็นตัวอย่างสำหรับการสร้าง UI ต่อไป
- screen.png (ตัวอย่าง screenshot ของหน้านั้น ๆ)
ทำ Version Control บันทึก และย้อนการแก้ไขใน Code ด้วย Git


เก็บประวัติการทำงานและสำรองโค้ดด้วยการ Commit และ Push ไปยัง Main บน GitHub การทำ Versioning ด้วย GitHub และการตรวจสอบ Sourcecode
Vibe Coding ด้วย VibeKit
ในขั้นตอนนี้จะเป็นการเริ่ม Vibe Coding ใน Project จริง โดยเราต้องสร้าง File Spec addons.md และใส่ข้อมูล PRD ให้เรียบร้อย ส่วน งานออกแบบจาก Stitch เราจะสร้าง Folder ใน GitHub Codespaces เพื่ออ้างอิงต่อไป
ในการพัฒนา Application ให้มีประสิทธิภาพ เราจะแบ่งกระบวนการทำงานออกเป็นดังนี้
- การสร้าง Database ในระบบพร้อมข้อมูลตัวอย่าง
- การสร้าง UI สำหรับแสดงผลให้ Visitor
- การสร้าง UI สำหรับ Admin ในการจัดการ Content
ระหว่างการทำงานสามารถบันทึกการทำงาน (Version Control) ไว้ใน Git ได้ และยกเลิกการแก้ไขบางส่วนได้
สร้าง Database ในระบบพร้อมข้อมูลตัวอย่าง
สร้างโครงสร้างข้อมูล และตัวอย่างข้อมูล (ในการทำงาน แต่จะไม่มีบน Production) เพื่อเป็นโครงสำหรับสร้าง UI
Prompt template สำหรับสร้าง Database
อ่านไฟล์ #file:addons.md ที่กำหนด
และเริ่มสร้าง Database ตาม Project Standard โดยมีการ mock data ตัวอย่างเข้าไปใน Database ด้วย Script seed-mock.ts และตรวจสอบการทำงานหลังทำด้วย "npx prisma validate" และ "npx prisma migrate status"

Plan and Ask before coding
เบื้องหลังการทำงานของ Prompt (คำอธิบาย)
- แก้ไขไฟล์ Schema (โครงสร้างของ Database) ที่
prisma/schema.prisma - แก้ไขไฟล์ ตัวอย่างข้อมูลทดสอบ ที่
seed-mock.ts - เพิ่มข้อมูลทดสอบลงใน Database ด้วย
npm run seed:mock - สร้าง Migration file เพื่อบันทึกประวัติการสร้าง Database ด้วย
npx prisma migrate dev --name <ชื่อที่อธิบายการเปลี่ยนแปลง> - อัปเดต Schema file ให้ตรงกับใน Database ด้วย
npx prisma generate - ตรวจสอบผลการทำงานผ่าน
npx prisma validate && npx prisma migrate status
ตรวจสอบผลการทำงานด้วยการตรวจสอบข้อมูลจำลองใน Database ผ่าน Database viewer
บทความที่เกี่ยวข้อง (ส่วนเสริม)
สร้าง UI ในระบบ
ในส่วนของการสร้าง UI ในระบบ เราจะเริ่มจากสร้าง UI เพื่อแสดงผลข้อมูลก่อนเพื่อตรวจสอบว่าระบบทำงานถูกต้องมั้ย จึงค่อยเพิ่มเรื่องการเพิ่ม / แก้ไข และลบข้อมูล
Prompt template สำหรับสร้าง UI
การสั่งงาน AI เราจะมี Keyword โดยมี Pattern ในรูปแบบนี้
IN __(url, page)__,

WHEN user do __(action)__ THEN __(result)__

__(condition)__

Plan and Ask before coding- IN __(url, page)__,: มีการ reference ถึง URL ที่ต้องการ
- WHEN __(action)__: มีการระบุเมื่อผู้ใช้งานทำอะไรบางอย่าง เช่นกดปุ่ม, ดูข้อมูล, พิมค้นหา
- THEN __(result)__: ผลลัพธ์ที่เกิดจากการกระทำ โดยอาจจะเพิ่มเงื่อนไข เช่น ถ้าค้นหาสำเร็จให้แสดงผล __ หากไม่สำเร็จให้แสดงผล __
- __(condition)__: เงื่อนไขอื่น ๆ
ตัวอย่าง Prompt การสร้าง UI แสดงผลข้อมูล
โดย UI จะประกอบไปด้วย
- Home page หน้าแรกที่เข้ามาเว็บไซต์ และมี Contact Form
- Blog page
- Blog detail page
In home page,
User can see UI (Use reference from @design_folder).
In dashboard page,
User role user, admin can see list of post.Package ที่ใช้ใน Project
ในการทำระบบจัดการ Content มีการใช้ Package เพิ่มเติมเพื่อเพิ่มความสามารถดังนี้
- react-markdown สำหรับแสดงผลข้อความจาก Markdown format
- mdxeditor สำหรับทำส่วนของการแก้ไขข้อความแบบ Text Editor
อ่านไอเดียการใช้ Keyword เพื่อสั่งงาน AI ได้ที่ 4 ประโยคที่จะทำให้มือใหม่ คุยกับ AI Coding Tools ได้ดีขึ้น
หากต้องการระบุ UI แบบเฉพาะให้ดูชื่อตาม
แนวทางการทดสอบระบบ (Manual Testing)
การทดสอบระบบก่อนใช้งานจริง (Acceptance Testing) เป็นสิ่งสำคัญเพื่อป้องกันข้อผิดพลาด เราสามารถใช้ Prompt ให้ AI สร้าง Test Case สำหรับทดสอบการทำงานทีละฟีเจอร์ได้
Prompt สำหรับสร้าง Test Case เพื่อตรวจสอบการทำงานเอง
For the existing project structure,
please create a markdown file containing test cases to help users test the app's functionality before launch.
Final Check
ตรวจสอบขั้นสุดท้าย (Pre-Deploy Checklist) ก่อนใช้งานจริง เพื่อให้มั่นใจว่า Application สามารถ Deploy ได้
Please run final check and fix issues to ensure that this app can build in production.

You are a pre-deployment verification agent. Your job is to run a complete
pre-deploy check on this Next.js + Prisma + TypeScript project and report
the results.

Run the following checks in order.

---

## Stage 1 — Code Quality

1. [CRITICAL] Run TypeScript type check (no emit):
   npx tsc --noEmit
   → Report: number of errors, list each error with file:line

2. [CRITICAL] Run ESLint:
   npm run lint
   → Report: number of errors/warnings, list each with file:line

3. Run Prettier format:
   npm run format

---

## Stage 2 — Build

4. [CRITICAL] Run production build:
   npm run build
   → Report: whether build succeeded or failed
   → If failed: copy the exact error message and file:line
   → If succeeded: note any warnings (e.g. large bundle sizes, missing metadata)

---

## Stage 3 — Database

5. Check Prisma migration status:
   npx prisma migrate status
   → Report: whether schema is in sync or has pending migrations
   → List any unapplied migrations by name

6. Regenerate Prisma client:
   npx prisma generate
   → Report: success or failure


---
เบื้องหลังการทำงานของ Prompt (คำอธิบาย)
ส่วนที่ Highlight คือคำสั่งที่สามารถลองพิมเพื่อรันใน Terminal เพื่อตรวจเช็คด้วยตัวเองได้
Stage 1 — Code Quality (เร็วสุด, ทำก่อน)
ตรวจสอบ Sourcecode เบื้องต้นที่อาจจะเขียนผิดพลาด คำสั่งไม่ถูกต้องผ่าน
- หา typescript error ทั้งหมดโดยไม่ต้อง build:
npx tsc --noEmit - หา lint errors ที่อาจทำให้ build fail:
npm run lint - Format โค้ดให้อ่านง่าย (optional แต่ดี):
npm run format
Stage 2 — Build Verification (สำคัญที่สุด)
ตรวจสอบว่าระบบสามารถ Build ใน Production ได้หรือไม่ผ่าน
npm run build
Stage 3 — Database & Schema
- ตรวจสอบว่า Prisma Schema sync กับ DB จริงผ่าน
npx prisma migrate status - สร้าง Prisma Client ให้ตรงกับ schema ปัจจุบันผ่าน
npx prisma generate
Deployment ผ่าน Railway
FAQ & Common Error
- เมื่อเกิดปัญหาไม่สามารถ Login ได้ Error 400: redirect_uri_mismatch
- Login แล้วไม่ได้สิทธิเป็น Admin อาจจะเป็นเพราะไม่ใช่ User แรกที่ Login ให้เข้าไปแก้ไขสิทธิเอง
npm run setupไม่ได้ แสดง errortsx src/scripts/setup.ts
sh: 1: tsx: not found
แปลว่าระบบยังติดตั้งไม่เสร็จให้รอติดตั้งให้เสร็จก่อน ค่อยใช้งาน Terminal- GitHub Codespaces ใช้งานไม่ได้ /เตือนโควตาเต็ม: ปิด Codespace ที่ไม่ได้ใช้งานเป็นประจำ เพราะแผนฟรีให้ 60 ชั่วโมง/เดือนเท่านั้น